The ArtRage 4.5 Update Is Now Available!

We are delighted to announce that the 4.5 update is finally available to download! This free update to ArtRage 4 comes with exciting and useful new features and a long list of improvements and bug fixes. From the enormous speed increases offered by 64-bit support to the extremely useful Grids and the improved Font Picker, we’re sure you will enjoy this update and look forward to what all our amazing users will do with it.
Available to all existing owners of ArtRage 4, it can be downloaded through the member area by registering your serial number there. Owners of previous editions can also upgrade to ArtRage 4.5 at a 50% discount through the member area, and newcomers to ArtRage can purchase ArtRage 4.5 through the store.
New Features
- 64-bit Support
- Grids
- Live Pencil Tilt
- Resource Object Drag
- Resource Object Move and Duplicate
- Global Samples
- Font Picker
- OS X Multitouch
- OS X Menus
For full technical detail about the additional features, bug fixes and minor tweaks, check out the ArtRage 4.5 version history
For a guide to Grids, see Grids in ArtRage 4.5.
64 Bit Support
Our most exciting new feature is 64 bit support. ArtRage 4.5 can make use of 64 bit memory, which means that it now works much faster and can easily handle larger canvases. While the maximum file size is still dependent on your computer, you should be able to work at approximately double your current sizes. You can also play back iPad scripts at much bigger sizes.
I can definitely say that I’ve felt the benefit of improved speed.
I have 64-bit on my Dell, and the upgrade has certainly made a big difference there as well.
Undo and Transform
Undo actions and the Transform tool have been sped up so as to remain usable at larger sizes. They should now be faster at all canvas sizes.
32 Bit Support
While 32 bit systems do not benefit from the additional memory in a 64 bit system, 32 bit users should still see an increase in speed and responsiveness.
Grids
The second big feature is the implementation of the Grid tool. The grid acts as a reference tool with resizeable grid overlays on your drawing and references images, and as an interactive drawing tool using the Snap To Grid function.
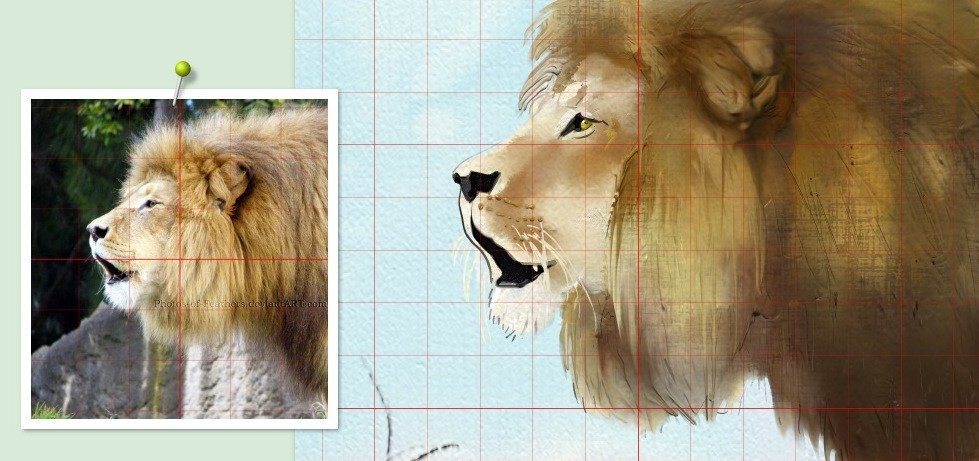
You can learn more about the Grid feature here: Grids in ArtRage 4.5
The grid is a very flexible tool and can be used for a wide range of things, such as:
- general composition
- aligning elements for design work
- patterns and mazes
- blocky cityscapes
- lettering
- quick straight lines or squares
We look forward to seeing what everyone uses it for!
To me, a teacher, instructor, the “grid” is a very powerful resource in many ways:
- It allows students to have baselines to establish comparative dimensions.
- It allows them to center or decenter texts using AR as a tool for teaching materials.
- The “Grid” is not static. Is manageable for each of us, we can change it even in color.
Para mí, que soy docente, instructor, la “Grilla” (Grid) es un recurso muy potente en muchos sentidos:
- Permite a los estudiantes contar con líneas de referencia para establecer dimensiones comparativas.
- Permite centrar, o descentrar textos al utilizar AR como herramienta de material didáctico.
- La “Grilla” (Grid), no es estática. Es manejable por cada uno de nosotros, podemos modificarla incluso en el color.
I am finding the grid really useful. As a lover of Art Nouveau style borders, I can see where to work within the grid, then use the symmetry tool to create one in a flash, which I am having such fun doing. ‘Snap to’ on the grid with Ink Pen Smoothing is also useful to get those sleek controlled sweeps. The grid is also wonderful for accurate placement of items on my artwork.
I use the grid system all the time now. As part of my work flow, I often take the time to stop and make custom brushes using the sticker spray system. Having a grid for column and row layout has made this process a snap. I find much less need to create stickers outside of the ArtRage work environment.

Live Pencil Tilt
Another much requested feature, you can now use live tilt with the Pencil tool. This subtle but important change that should improve the realism of the pencil, reflecting thick and thin shading from your pencil lead.
Notes:
- Requires a compatible tablet, but this is a common feature in most graphics tablets
- Precise must be turned off. Tilt must be visible in the Settings panel
The pencil tool has gotten a new soul breathed into it. With the new life pencil tilt function, I find the pencil to be one of the most natural and responsive tools in the kit. You may want to go into your global pen settings (in my case Wacom settings in the control panel) and dial in the tilt sensitivity to taste. I just tap that ‘enter’ key and go into workbench mode and sketch and doodle my heart out. It really takes me to the ‘zone’ where the magic happens. 😉
Resources
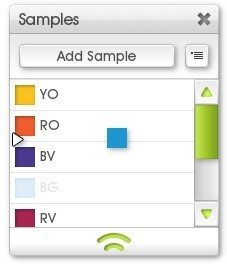
Resource Object Drag
You can now drag swatches and Toolbox objects to reposition them in both Workbench and pod views.
The Toolbox allows you to collect various resources (such as specific layers, tool presets, color samples and stencils) in one place. Essentially, it’s a shortcut collection to anything you want to use while painting.
- Open the Toolbox by going to View > Toolbox Panel
- Go to Workbench view by pressing Enter. Presets and color samples added to the Toolbox appear in the right half of the bar

I have found the ability to drag items around in the toolbox to reorganise at will very useful. I’ve found it particularly handy for tinkering with sets of colour samples, when you need to add a new colour and want it to fit in.
Resource Object Move & Duplicate
You can now move resources such as Stencils and Presets between Groups, or duplicate them.
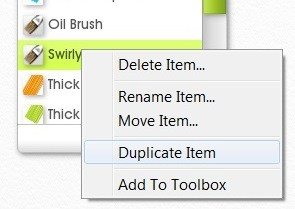
Note: Original presets cannot be moved (but can be duplicated and the copy moved).
Global Samples
Global Samples are now stored in their own file so that when you delete Preferences you won’t accidentally delete your samples as well.
Font Picker
The Font Picker has received a much needed upgrade and now has a much more user friendly interface and preview of the selected font. You can navigate using the arrow keys, scrolling, or by typing the first two letters in the font name.
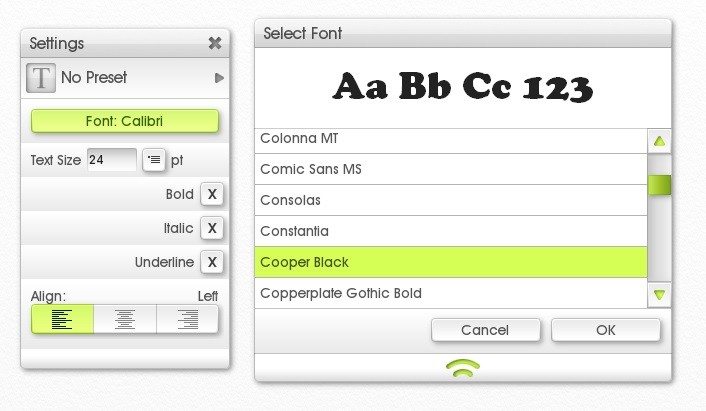
The text editing now allows you to change all text in a selected layer (without selecting the text), or to mix and match fonts and formatting options within a single text block.
I am absolutely delighted with the improved Font Selection process. Before this upgrade it was so clunky and difficult to trawl through the list and then actually get your text up and running. Now it is easily accessible, and adjustable to the size you want.

Mac OS X Improvements
OS X Multitouch
You can now use touch input devices on OS X to Pan, Scale, and Rotate the canvas. We’ve also adjusted the touch support system so that panning isn’t so slow in 10.9
OS X Menus
We’ve added a Preferences and About ArtRage menu item to the ‘ArtRage’ menu item in the system menu as per the OS default.
Learn Even More
For full technical detail about the additional features, bug fixes and minor tweaks, check out the ArtRage 4.5 version history
For a guide to Grids, see Grids in ArtRage 4.5.
How To Install and Use 4.5: Quick Questions and Answers

Most of you won’t need to worry about most of these questions, but the 64 bit version does raise a few new issues for some people.
Quick Glossary
Sometimes there is a bit of confusion over which words we are using to mean which update to which program. This is what the terms in the following FAQs refer to.
Edition: Edition refers to the different programs. E.g. ArtRage 2, ArtRage for iPad. In this case, ArtRage 4 and ArtRage 4.5 are not separate editions, but ArtRage Studio Pro and ArtRage 4.5 are.
Version: The different versions are updates to previous versions within the same edition. Indicated by the changing numbers, e.g. ArtRage 3.5.4 versus 3.5.11 or ArtRage 4.0.6 versus ArtRage 4.5.
Update: Installing a free update (new version) of the same edition, e.g. from ArtRage 4 to ArtRage 4.5
Upgrade: Changing to a new edition, e.g. from ArtRage Studio Pro to ArtRage 4.5
Okay, now we’ve got that sorted, onto the answers about installing, upgrading and working with 64 bit!
Updating or Upgrading to ArtRage 4.5
How to Upgrade from ArtRage 2 or ArtRage 3 (Studio & Studio Pro) to ArtRage 4.5
If you own an earlier edition of ArtRage, you can upgrade to the latest edition in exactly the same way you would have upgraded to ArtRage 4.
- Register your ArtRage serial number in the Member Area
- You will see an “Upgrade to ArtRage 4” button. This will take you to our online store with a 50% discount applied.
- Your purchase will allow you to download either ArtRage 4 or ArtRage 4.5
How To Update from ArtRage 4 to ArtRage 4.5
If you currently own ArtRage 4, then you can download the latest update the same way you download all updates: from the Member Area or automatically through Steam. The 4.5 update includes a number of major features and is much more significant that other incremental updates, but it is still a free update to ArtRage 4.
ArtRage 4.5 and Windows XP
If you are a Windows XP user, then you will not be able to run ArtRage 4.5 You will be able to download the last version of ArtRage 4 (4.0.6) from the Member Area or from Steam.
If you are not a Windows XP user, then you can ignore the option to download 4.0.6 as you do not need it.
Where does ArtRage 4.5 install on Windows?
ArtRage 4.5 installs into one of two different places (“Program Files” or “Program Files (x86)”) depending on whether you have 32 bit or 64 bit system, and whether or not you had ArtRage 4 Already installed when you updated. This is simply due to the way that Windows organises 32 and 64-bit programs.
It does not matter which folder ArtRage 4.5 installs to, it will work exactly the same way in either location.
Will the update run on 32 bit Windows/OSX?
Yes. ArtRage 4.5 includes both 64 bit and 32 bit versions and will run the one that matches your system.
Running 32 Bit ArtRage on a 64 Bit System
If you wish to run ArtRage in 32 bit mode so that you can use 32 Bit Photoshop filters, this is possible in both Mac OS and Windows.
Find the “ArtRage32” shortcut in the Windows start menu, or “ArtRage32.exe” in the program folder.
Go to Finder > File > Get Info > 32-bit Mode (Mac OS)
How to tell if you have a 64 Bit System
If you are not sure whether your computer is 32 or 64 bit, follow these instructions (note: external website links).
More Information
If you would like to learn more, see the FAQs, ask in the ArtRage forums or contact tech support.
Credits
Testimonials
The quotes in this announcement come from some of our fantastic beta testers (thanks guys! You’re all awesome!).
Check out some of their artwork at their websites:
Like The Art?
If you enjoyed the images from our awesome beta testers, check out these artist features as well!
[fp_carousel width=”940″ height=”200″ items=”5″ num=”-1″ speed=”600″ cat=”Tutorials” orderby=”date” post_type=”post”]